Hello Everybody,
Just Today Launched a new Blog For all of You on Poems and Shayari.
You can find that Blog here:
http://poems-shayari.blogspot.com/
With Regards,
Luvzguy
Wednesday, February 25, 2009
Sunday, February 22, 2009
Tips for Managing Web Color in Photoshop
Do your images shift colors once you save for the Web and view in a browser? No more! Here's how to achieve a "no surprises" Photoshop-to-Web-image workflow.
You spend hours in Photoshop creating the perfect background image (or button, or photograph) for a client's Web site. From the native .psd file, which you were careful to keep in RGB mode, you use Save for Web (from the File menu) to create a .jpeg, .gif, or .png version of it.
But when you view your saved-for-Web artwork in a browser, ack! A significant color shift washed out the intensity of your colors and reduced the contrast overall. Yet when you open that .gif or .jpeg or .png in Photoshop, the colors shift back to what the original .psd file looked like. Dang!
Sound familiar? If you've driven yourself crazy trying to figure out what's going on here, this article's for you.
What's Going On Here
The most common cause is that you're using Photoshop in a way that's meant for print work, not Web work. You're probably using Photoshop for both, right? And figured, since all Web artwork is RGB, as long as you keep the Photoshop file as an RGB image, what you see in Photoshop will be what you get when you open the RGB image in a browser.
But there are actually two types of RGB you can use in Photoshop. The one for print is called "Adobe RGB (1998)" and is what you're using if your Color Settings (in the Edit menu) are using any Presets with "Prepress" in the title. Look at the first dropdown menu called RGB Working Space and you'll see that Adobe RGB (1998) is active.
The other type of RGB is called "sRGB [bunch of numbers here]" and is the default color space of every Web browser known to mankind. If your Color Settings are using a Preset with "Internet" in the title, that's what your Working Space RGB is set to -- sRGB. But if it was, then you wouldn't be reading this article.
The key here is that when you choose Save for Web, Photoshop automatically converts your image to sRGB. Or to put it another way, it's stripping the Adobe RGB (1998) profile attached to the image, since GIFs and PNGs don't support profiles.
Browsers also ignore profiles and assume every image is in sRGB, which is what Save for Web is showing you. (JPEGs can optionally embed a color profile, but only Safari recognizes them. If you want a JPEG with an Adobe RGB profile, you have to use Save As, not Save for Web. And hope all your site visitors are using Safari.)
You can see the sRGB color shift happen right there in the Save for Web dialog box, but it's easy to fool yourself into thinking it's just a "crappy preview in a dialog box" thing. Nope, it's actually showing you the image as it will be seen in a browser, without a profile, a naked sRGB image. You can click the little globe icon at the bottom of the dialog box to open a preview of the artwork in a real browser and confirm it.
So why, when you open that sRGB Web artwork in Photoshop, does the image look almost exactly like the original PSD file -- no color shift? Probably because Photoshop defaults to assigning your current RGB Working Space -- Adobe RGB (1998) -- to images with a different or missing profile while you have it open. This can happen without you even being aware of it if you've turned off the "Missing Profiles: Ask When Opening" option in your Color Settings.
How to See What You'll Get
There are two parts to achieving a "no surprises" Photoshop-to-Web-image workflow.
First, pre-empt Save for Web's color shenanigans by converting your image to sRGB before it gets there. If you change Photoshop's color management settings (Edit > Color Settings) to the Web/Internet preset, or just choose sRGB as your RGB Working Space, all new files you create will use sRGB from the start. It's a good habit to get into before sitting down to a Web graphics session in Photoshop. (Don't forget to switch back to a print-centric preset, or switch back to Adobe RGB, when you're done.)
The new color settings will not affect existing images with embedded Adobe RGB profiles. To change an existing image, open it and go to Edit > Convert to Profile (not Assign to Profile). Choose sRGB for the image's Destination Space and click OK. If you open the Convert to Profile dialog box again, you'll see that both the Source and the Destination spaces have changed to sRGB.
The best part about converting to sRGB in the main program (instead of letting Save for Web do it for you) is that the colors are actually mapped to the new color space while maintaining the existing colors as much as possible. It's often difficult to detect any significant color shift at all in the move from Adobe RGB to sRGB. But they are most definitely sRGB, so when you use Save for Web, the colors are maintained, within the limits of the file format you choose.
The second task of the no-surprises workflow is especially important for Mac designers. You probably know that monitor settings in Windows have a higher gamma (2.2) than Macs (1.8) ... and if you don't know nothin' 'bout gamma numbers, Miz Scarlett, just know that all monitor colors are darker on Windows. Since Web images are viewed on a monitor, all your Web images will appear significantly darker to the vast majority (like, 90%) of people viewing the Web site on a PC than they do on your Mac.
It's surprisingly easy to set up Photoshop on either platform so that images appear as they would in the other's browser. If you're on a Mac, first go to the View > Proof Setup fly-out menu and choose Windows RGB. Second, press Command-Y (Ctrl-Y on a PC). Third... there is no third. Command/Ctrl-Y toggles View > Proof Colors on and off. When it's on, the image in Photoshop looks just as it would in a PC browser.
If you're a PC-based Web designer and you want to see how something will look to a Mac user, set the Proof Setup fly-out menu to Macintosh RGB before turning on Proof Colors.
Web Features in the Info Palette
You may already know that if you choose Palette Options from Photoshop's Info palette menu, you can choose two color readouts that the Info palette dynamically updates as you move your cursor around the image.
Savvy print designers like to set the first color readout to RGB (because they're working in RGB, the most flexible color space) and the second color readout to CMYK, because when they're done with the image they'll be converting it to CMYK from the Image > Mode menu. So as they work on the RGB image, they can get an inkling of how various areas will translate to CMYK mixes without actually converting.
If you're creating an image for an existing Web site and you have to match colors there -- which are usually supplied to you in Hexadecimal code, such as C6C6C6 -- you might want to choose Web Color as your second readout in the palette. Web color shows you the Hex code for RGB colors in the right side of the palette. That way you can hover over any part of your image and confirm that it's the exact color you want to match.
More Web-friendly goodies are hiding in the Info Palette Options dialog box. When I'm working on a Web project in Photoshop, I like to change the Mouse Coordinates to Pixels -- it's all about the pixels, baby. And in Status Information, I turn on Document Profile (you know why) and Document Dimensions, which saves me from having to obsessively check Image > Image Size to assure myself yes, I specced my file correctly, so the button I'm working on is exactly the size I need.
11 Sites To Create Cartoon Characters of Yourself
11 Sites To Create Cartoon Characters of Yourself

If you are not comfortable using real photos to represent yourself in any online profiles and avatars, why not create a cartoon characters of yourself? It’ll definitely be fun and unique to others when you are representing yourself in a cartonized way in any online profiles and avatars, anywhere from Gravatar to MyBlogLog, blog profiles, Facebook, MySpace, Friendster, etc.
Thanks to many free web services, you don’t have to pay an artist for your cartoon illustrations. All you have to do is upload your photo, or perform some mix and match. Here’s 11 websites that allows you to create a cartoon character of yourself.
-
Portrait Illustration Maker
Portrait Illustration Maker is a service which provides character icons completely free of charge! They are available for your blog site or SNS. If you’d like to save the completed avatar, right-click on the icon. And then select "Save Picture As… " from the menu.

-
WeeWorld
Create an cartoon character to represent yourself in WeeWord games (WeeMee) or just export it for anywhere else.

-
Meez
Social entertainment website that allows users to create their own animated avatars, or "3D I.D." graphics, for the Web, to play casual games with their avatars, and to use them in customizable Rooms on social networks like Facebook.

-
Simpsonize Me
Turn yourself into a simpson character.

-
Yahoo! Avatars

-
BeFunky

-
Buscar Messenger

-
Cartoon Me
Cartoonize yourself as simple as uploading your photo, Cartoon Me will do the rest.

-
Joystiq Mii characters
Think of it as creating Mii characters, but online so you can use it anywhere.

-
MyPlay
By far, one of the most sophisticated cartoon character creating free service. However this Taiwanese site is only for those who are able to interpret chinese words.

-
South Park Studio
For south park fans, now you can become one of them.

How To Access Blocked Web Sites
How To Access Blocked Web Sites
Proxy websites allows us to bypass our current ISP’s IP and connect to targeted website with a different IP, thus hiding our actual origin from detectable. Internet users use proxy websites for various reasons, some to access websites potentially blocked by their colleges or workplace, some use it to test their scripts.
90+ Proxy Websites To Access Blocked Websites
1. http://www.hidemyass.com
2. http://www.anonymizer.com
3. http://www.wujie.net
4. http://www.ultrareach.net
5. http://surfshield.net
6. http://www.guardster.com/subscription/proxy_free.php
7. http://anonymouse.ws/anonwww.html
8. http://www.browser-x.com
9. http://www.spysurfing.com
10. http://www.xerohour.org/hideme
11. http://www.proxyz.be
12. http://www.sc0rian.com/prox
13. https://www.proxify.us
14. http://kproxy.com/index.jsp
15. http://www.brawl-hall.com/pages/proxy.php
16. http://www.proxify.net
17. http://proxy.computersteroids.com/index0.php
18. http://www.unipeak.com
19. http://flyproxy.com
20. http://alienproxy.com
21. http://proxify.com/
22. http://www.unfilter.net
23. http://www.proxymouse.com
24. http://www.surfonym.com/cgi-bin/nph-proxy
25. http://www.superproxy.be/browse.pl
26. http://www.websiteguru.com/mrnewguy
27. http://www.letsproxy.com
28. http://www.fsurf.com
29. http://indianproxy.com
30. http://www.letmeby.com
31. http://Boredatschool.net
32. http://www.ibypass.org
33. http://www.ipzap.com/
34. https://proxify.biz
35. http://kproxy.com/index.jsp
36. http://www.attackcensorship.com/attack-censorship.html
37. http://mrnewguy.com
38. http://www.evilsprouts.co.uk/defilter
39. http://www.proxify.info
40. http://www.torify.com
41. http://www.switchproxy.com
42. http://www.proxifree.com
43. http://www.secure-tunnel.com/
44. http://www.proxify.cn
45. http://www.arnit.net/utilities/webproxy/new
46. http://www.proxify.co.uk
47. http://www.betaproxy.com
48. http://www.proxify.org
49. http://www.proxychoice.com
50. http://www.proxysnail.com
51. http://www.anonypost.com
52. http://www.thestrongestlinks.com
53. http://www.hujiko.com
54. http://www.anonproxy.info
55. http://www.peoplesproxy.com
56. http://www.freeproxy.us
57. http://www.proxyweb.net
58. http://www.nopath.com
59. http://urlencoded.com
60. http://www.pole.ws
61. http://www.browseany.com
62. http://www.spiderproxy.com
63. http://www.clickcop.com
64. http://www.sneakysurf.com
65. http://www.mywebtunnel.com
66. http://www.thewebtunnel.com
67. http://www.3proxy.com
68. http://www.yourfreeproxy.com
69. http://www.proxy7.com
70. http://www.fireprox.com
71. http://www.stupidcensorship.com
72. http://www.letsproxy.com
73. http://www.sneak2.com
74. http://www.cecid.com
75. http://www.freeproxy.ca
76. http://www.ibypass.org
77. http://www.goproxing.com
78. http://www.projectbypass.com/
79. http://www.ipsecret.com
80. http://www.nomorelimits.net
81. http://www.proxify.de
82. http://www.bywhat.com
83. http://www.snoopblocker.com
84. http://www.anonymizer.ru
85. http://www.proxyking.net/
86. http://www.perlproxy.com
87. http://www.proxylord.com
88. http://tntproxy.com
89. http://satanproxy.com
90. http://zombieinvasion.info
91. http://demonproxy.com
92. http://www.myfreeproxy.com
93. http://www.gezcem.com/nph-proxy.pl.old
94. http://mpleger.de
95. http://www.the-cloak.com/login.html
Disclaimer
Note that not all of them are working perfectly; some of these websites could be offline too. I’m not encouraging you to use this to bypass sites that you are banned from surfing in colleges, work place, etc. Use them with cautions make sure you know what you are doing. I shall not be held responsible for any damages or rules and regulation you violate from using these proxies.
Keyboard shortcuts for Microsoft Outlook
Keyboard shortcuts for Microsoft Outlook
Here are a list of shortcuts to help you move faster in Microsoft Outlook
* Alt + . (period) Open the Address Book with the To field selected
* Alt + A Open the Action drop-down menu
* Alt + B Open the Address Book with the BCC field selected
* Alt + C Select message recipients for CC field
* Alt + D Switch to Daily calendar view
* Alt + E Open the Edit drop-down menu
* Alt + F Open the File drop-down menu
* Alt + G Open the Go drop-down menu
* Alt + H Open the Help drop-down menu
* Alt + I Open the Find tool bar / Open the Insert drop-down menu
* Alt + J Move to the Subject field
* Alt + K Check names in the To, CC, or BCC field against the Address Book (cursor must be in the corresponding message header field)
* Alt + L Reply All
* Alt + M Switch to Monthly calendar view
* Alt + N Open the Accounts drop-down menu
* Alt + O Open the Format drop-down menu / Switch to Today calendar view
* Alt + P Open the Message Options dialog box
* Alt + R Reply / Switch to Work Week Calendar view
* Alt + S Send
* Alt + T Open the Tools drop-down menu
* Alt + V Open the View drop-down menu
* Alt + W Forward an item / Switch to Weekly calendar view
* Alt + Y Switch to Daily calendar view
* Ctrl + 1 Go to Mail
* Ctrl + 2 Go to Calendar
* Ctrl + 3 Go to Contacts
* Ctrl + 4 Go to Tasks
* Ctrl + 5 Go to Notes
* Ctrl + 6 Go to Folder List
* Ctrl + 7 Go to Shortcuts
* Ctrl + 8 Go to Journal
* Ctrl + A Select all
* Ctrl + B Bold when editing a rich text message
* Ctrl + C Copy
* Ctrl + D Delete an item (message, task, contact, etc.)
* Ctrl + E Activate the Find drop-down menu / Center Align when editing a rich text message
* Ctrl + F Forward
* Ctrl + J Open a new Journal Entry from the selected item (message, task, contact, etc.)
* Ctrl + K Check names in the To, CC, or BCC field against the Address Book (cursor must be in the corresponding message header field)
* Ctrl + M Send/Receive all
* Ctrl + O Open
* Ctrl + P Print
* Ctrl + Q Mark the selected message Read
* Ctrl + R Reply
* Ctrl + S Save a draft message
* Ctrl + T Tab
* Ctrl + U Mark the selected message Unread
* Ctrl + V Paste
* Ctrl + X Cut
* Ctrl + Y Go to Folder
* Ctrl + Z Undo
* Ctrl + Backspace Delete the previous word
* Ctrl + End Move to the end
* Ctrl + Home Move to the beginning
* Ctrl + Shift + A Open a new Appointment
* Ctrl + Shift + B Open the Address Book
* Ctrl + Shift + C Create a new Contact
* Ctrl + Shift + E Open a new folder
* Ctrl + Shift + F Open the Advanced Find window
* Ctrl + Shift + G Flag message for follow up
* Ctrl + Shift + J Open a new Journal Entry
* Ctrl + Shift + K Open a new Task
* Ctrl + Shift + L Open a new Distribution List
* Ctrl + Shift + M Open a new Message
* Ctrl + Shift + N Open a new Note
* Ctrl + Shift + O Switch to the Outbox
* Ctrl + Shift + P Open the New Search Folder window
* Ctrl + Shift + Q Open a new Meeting Request
* Ctrl + Shift + R Reply All
* Ctrl + Shift + S Open a new Discussion
* Ctrl + Shift + U Open a new Task Request
* Ctrl + Shift + Y Copy a Folder
* Shift + Tab Select the previous message header button or field
* F1 Open Outlook Help
* F3 Activate the Find toolbar
* F4 Open the Find window
* F7 Spellcheck
* F9 Send and receive all
* F10 Select File from the Outlook toolbar button
* F11 Activate the “Find a contact” dialog box
* F12 Save As
* Alt + F4 Close the active window
80 Keyboard shortcuts for Microsoft Outlook
80 Keyboard shortcuts for Microsoft Outlook
Here are a list of shortcuts to help you move faster in Microsoft Outlook
* Alt + . (period) Open the Address Book with the To field selected
* Alt + A Open the Action drop-down menu
* Alt + B Open the Address Book with the BCC field selected
* Alt + C Select message recipients for CC field
* Alt + D Switch to Daily calendar view
* Alt + E Open the Edit drop-down menu
* Alt + F Open the File drop-down menu
* Alt + G Open the Go drop-down menu
* Alt + H Open the Help drop-down menu
* Alt + I Open the Find tool bar / Open the Insert drop-down menu
* Alt + J Move to the Subject field
* Alt + K Check names in the To, CC, or BCC field against the Address Book (cursor must be in the corresponding message header field)
* Alt + L Reply All
* Alt + M Switch to Monthly calendar view
* Alt + N Open the Accounts drop-down menu
* Alt + O Open the Format drop-down menu / Switch to Today calendar view
* Alt + P Open the Message Options dialog box
* Alt + R Reply / Switch to Work Week Calendar view
* Alt + S Send
* Alt + T Open the Tools drop-down menu
* Alt + V Open the View drop-down menu
* Alt + W Forward an item / Switch to Weekly calendar view
* Alt + Y Switch to Daily calendar view
* Ctrl + 1 Go to Mail
* Ctrl + 2 Go to Calendar
* Ctrl + 3 Go to Contacts
* Ctrl + 4 Go to Tasks
* Ctrl + 5 Go to Notes
* Ctrl + 6 Go to Folder List
* Ctrl + 7 Go to Shortcuts
* Ctrl + 8 Go to Journal
* Ctrl + A Select all
* Ctrl + B Bold when editing a rich text message
* Ctrl + C Copy
* Ctrl + D Delete an item (message, task, contact, etc.)
* Ctrl + E Activate the Find drop-down menu / Center Align when editing a rich text message
* Ctrl + F Forward
* Ctrl + J Open a new Journal Entry from the selected item (message, task, contact, etc.)
* Ctrl + K Check names in the To, CC, or BCC field against the Address Book (cursor must be in the corresponding message header field)
* Ctrl + M Send/Receive all
* Ctrl + O Open
* Ctrl + P Print
* Ctrl + Q Mark the selected message Read
* Ctrl + R Reply
* Ctrl + S Save a draft message
* Ctrl + T Tab
* Ctrl + U Mark the selected message Unread
* Ctrl + V Paste
* Ctrl + X Cut
* Ctrl + Y Go to Folder
* Ctrl + Z Undo
* Ctrl + Backspace Delete the previous word
* Ctrl + End Move to the end
* Ctrl + Home Move to the beginning
* Ctrl + Shift + A Open a new Appointment
* Ctrl + Shift + B Open the Address Book
* Ctrl + Shift + C Create a new Contact
* Ctrl + Shift + E Open a new folder
* Ctrl + Shift + F Open the Advanced Find window
* Ctrl + Shift + G Flag message for follow up
* Ctrl + Shift + J Open a new Journal Entry
* Ctrl + Shift + K Open a new Task
* Ctrl + Shift + L Open a new Distribution List
* Ctrl + Shift + M Open a new Message
* Ctrl + Shift + N Open a new Note
* Ctrl + Shift + O Switch to the Outbox
* Ctrl + Shift + P Open the New Search Folder window
* Ctrl + Shift + Q Open a new Meeting Request
* Ctrl + Shift + R Reply All
* Ctrl + Shift + S Open a new Discussion
* Ctrl + Shift + U Open a new Task Request
* Ctrl + Shift + Y Copy a Folder
* Shift + Tab Select the previous message header button or field
* F1 Open Outlook Help
* F3 Activate the Find toolbar
* F4 Open the Find window
* F7 Spellcheck
* F9 Send and receive all
* F10 Select File from the Outlook toolbar button
* F11 Activate the “Find a contact” dialog box
* F12 Save As
* Alt + F4 Close the active window
Keyboard shortcuts (Windows)
Keyboard shortcuts (Windows)
Getting familiar with keyboard shortcuts not only help you get the work done faster, but also more efficient. If your daily job rely heavily on using Windows, here are some 100+ Windows Keyboard Shortcuts you might want to check out. If there’s any nifty shortcuts we have missed, appreciate a heads up.
The General Shortcuts
We’ll kickoff the list with some really general shortcuts that you often used.
* CTRL+C (Copy)
* CTRL+X (Cut)
* CTRL+V (Paste)
* CTRL+Z (Undo)
* DELETE (Delete)
* SHIFT+DELETE (Delete the selected item permanently without placing the item in the Recycle Bin)
* CTRL while dragging an item (Copy the selected item)
* CTRL+SHIFT while dragging an item (Create a shortcut to the selected item)
* F2 key (Rename the selected item)
* CTRL+RIGHT ARROW (Move the insertion point to the beginning of the next word)
* CTRL+LEFT ARROW (Move the insertion point to the beginning of the previous word)
* CTRL+DOWN ARROW (Move the insertion point to the beginning of the next paragraph)
* CTRL+UP ARROW (Move the insertion point to the beginning of the previous paragraph)
* CTRL+SHIFT with any of the arrow keys (Highlight a block of text)
* SHIFT with any of the arrow keys (Select more than one item in a window or on the desktop, or select text in a document)
* CTRL+A (Select all)
* F3 key (Search for a file or a folder)
* ALT+ENTER (View the properties for the selected item)
* ALT+F4 (Close the active item, or quit the active program)
* ALT+ENTER (Display the properties of the selected object)
* ALT+SPACEBAR (Open the shortcut menu for the active window)
* CTRL+F4 (Close the active document in programs that enable you to have multiple documents open simultaneously)
* ALT+TAB (Switch between the open items)
* ALT+ESC (Cycle through items in the order that they had been opened)
* F6 key (Cycle through the screen elements in a window or on the desktop)
* F4 key (Display the Address bar list in My Computer or Windows Explorer)
* SHIFT+F10 (Display the shortcut menu for the selected item)
* ALT+SPACEBAR (Display the System menu for the active window)
* CTRL+ESC (Display the Start menu)
* ALT+Underlined letter in a menu name (Display the corresponding menu)
* Underlined letter in a command name on an open menu (Perform the corresponding command)
* F10 key (Activate the menu bar in the active program)
* RIGHT ARROW (Open the next menu to the right, or open a submenu)
* LEFT ARROW (Open the next menu to the left, or close a submenu)
* F5 key (Update the active window)
* BACKSPACE (View the folder one level up in My Computer or Windows Explorer)
* ESC (Cancel the current task)
* SHIFT when you insert a CD-ROM into the CD-ROM drive (Prevent the CD-ROM from automatically playing)
Dialog Box Keyboard Shortcuts
* CTRL+TAB (Move forward through the tabs)
* CTRL+SHIFT+TAB (Move backward through the tabs)
* TAB (Move forward through the options)
* SHIFT+TAB (Move backward through the options)
* ALT+Underlined letter (Perform the corresponding command or select the corresponding option)
* ENTER (Perform the command for the active option or button)
* SPACEBAR (Select or clear the check box if the active option is a check box)
* Arrow keys (Select a button if the active option is a group of option buttons)
* F1 key (Display Help)
* F4 key (Display the items in the active list)
* BACKSPACE (Open a folder one level up if a folder is selected in the Save As or Open dialog box)
Microsoft Natural Keyboard Shortcuts
* Windows Logo (Display or hide the Start menu)
* Windows Logo+BREAK (Display the System Properties dialog box)
* Windows Logo+D (Display the desktop)
* Windows Logo+M (Minimize all of the windows)
* Windows Logo+SHIFT+M (Restore the minimized windows)
* Windows Logo+E (Open My Computer)
* Windows Logo+F (Search for a file or a folder)
* CTRL+Windows Logo+F (Search for computers)
* Windows Logo+F1 (Display Windows Help)
* Windows Logo+ L (Lock the keyboard)
* Windows Logo+R (Open the Run dialog box)
* Windows Logo+U (Open Utility Manager)
Accessibility Keyboard Shortcuts
* Right SHIFT for eight seconds (Switch FilterKeys either on or off)
* Left ALT+left SHIFT+PRINT SCREEN (Switch High Contrast either on or off)
* Left ALT+left SHIFT+NUM LOCK (Switch the MouseKeys either on or off)
* SHIFT five times (Switch the StickyKeys either on or off)
* NUM LOCK for five seconds (Switch the ToggleKeys either on or off)
* Windows Logo +U (Open Utility Manager)
Windows Explorer Keyboard Shortcuts
* END (Display the bottom of the active window)
* HOME (Display the top of the active window)
* NUM LOCK+Asterisk sign (*) (Display all of the subfolders that are under the selected folder)
* NUM LOCK+Plus sign (+) (Display the contents of the selected folder)
* NUM LOCK+Minus sign (-) (Collapse the selected folder)
* LEFT ARROW (Collapse the current selection if it is expanded, or select the parent folder)
* RIGHT ARROW (Display the current selection if it is collapsed, or select the first subfolder)
Shortcut Keys for Character Map
* After you double-click a character on the grid of characters, you can move through the grid by using the keyboard shortcuts:
* RIGHT ARROW (Move to the right or to the beginning of the next line)
* LEFT ARROW (Move to the left or to the end of the previous line)
* UP ARROW (Move up one row)
* DOWN ARROW (Move down one row)
* PAGE UP (Move up one screen at a time)
* PAGE DOWN (Move down one screen at a time)
* HOME (Move to the beginning of the line)
* END (Move to the end of the line)
* CTRL+HOME (Move to the first character)
* CTRL+END (Move to the last character)
* SPACEBAR (Switch between Enlarged and Nor mal mode when a character is selected)
Microsoft Management Console (MMC) Main Window Keyboard Shortcuts
* CTRL+O (Open a saved console)
* CTRL+N (Open a new console)
* CTRL+S (Save the open console)
* CTRL+M (Add or remove a console item)
* CTRL+W (Open a new window)
* F5 key (Update the content of all console windows)
* ALT+SPACEBAR (Display the MMC window menu)
* ALT+F4 (Close the console)
* ALT+A (Display the Action menu)
* ALT+V (Display the View menu)
* ALT+F (Display the File menu)
* ALT+O (Display the Favorites menu)
MMC Console Window Keyboard Shortcuts
* CTRL+P (Print the current page or active pane)
* ALT+Minus sign (-) (Display the window menu for the active console window)
* SHIFT+F10 (Display the Action shortcut menu for the selected item)
* F1 key (Open the Help topic, if any, for the selected item)
* F5 key (Update the content of all console windows)
* CTRL+F10 (Maximize the active console window)
* CTRL+F5 (Restore the active console window)
* ALT+ENTER (Display the Properties dialog box, if any, for the selected item)
* F2 key (Rename the selected item)
* CTRL+F4 (Close the active console window. When a console has only one console window, this shortcut closes the console)
Remote Desktop Connection Navigation
* CTRL+ALT+END (Open the m*cro$oft Windows NT Security dialog box)
* ALT+PAGE UP (Switch between programs from left to right)
* ALT+PAGE DOWN (Switch between programs from right to left)
* ALT+INSERT (Cycle through the programs in most recently used order)
* ALT+HOME (Display the Start menu)
* CTRL+ALT+BREAK (Switch the client computer between a window and a full screen)
* ALT+DELETE (Display the Windows menu)
* CTRL+ALT+Minus sign (-) (Place a snapshot of the active window in the client on the Terminal server clipboard and provide the same functionality as pressing PRINT SCREEN on a local computer.)
* CTRL+ALT+Plus sign (+) (Place a snapshot of the entire client window area on the Terminal server clipboard and provide the same functionality as pressing ALT+PRINT SCREEN on a local computer.)
Internet Explorer navigation
* CTRL+B (Open the Organize Favorites dialog box)
* CTRL+E (Open the Search bar)
* CTRL+F (Start the Find utility)
* CTRL+H (Open the History bar)
* CTRL+I (Open the Favorites bar)
* CTRL+L (Open the Open dialog box)
* CTRL+N (Start another instance of the browser with the same Web address)
* CTRL+O (Open the Open dialog box, the same as CTRL+L)
* CTRL+P (Open the Print dialog box)
* CTRL+R (Update the current Web page)
* CTRL+W (Close the current window)
Windows Printscreen Shortcuts
Windows Printscreen Shortcuts
By default, there isnt too much option in doing screen capture but enough to get the basic job done. Here are the keyboard shortcuts to do screen capture (printscreen) in Windows.
- PrtScn - The Print Screen button will save the entire screen in clipboard. You will then need to further edit it in some image editing programs or Microsoft Words.
- Alt + PrnScn - By holding Alt key while pressing PrtScn button, it captures only the active window. That means the window screen currently in view.
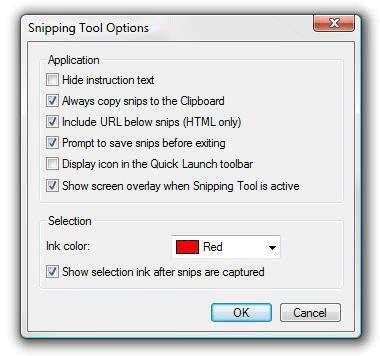
Windows Vista
Together with Windows Vista, an utility call Snipping Tool was introduced. It gives much more flexibility for screen capturing. Learn how to use Sniping Tool.
Mac Printscreen Shortcuts
Mac OSX covers more different ways to do screen capturing. It allows you to print screen active/non-active windows, full screen and selective area.
The following screen capture shortcuts print and output images on desktop in the format of .PNG (Portable Network Graphics)
- Command + Shift + 3 - Prints the entire screen, everything inside your monitor screen.
- Command + Shift + 4 - Prints the screen according to user selection. By using the following shortcut, your cursor will turned into a cross-hair and allows you to select the area you want to capture.
- Command + Shift + 4 then Space - By holding down Command + Shift + 4, your cursor will turn to cross-hair. Then hit the space bar once it will turned to a camera icon. This allows you to capture any opened windows, regardless of active or hiding behind.
If you want your screen capture to be kept in clipboard so you can paste them in image editing tools (eg. Photoshop) instead of output as .PNG, just include Control while using the shortcut.
- Control + Command + Shift + 3 - Captures entire screen, hold image in clipboard.
- Control + Command + Shift + 4 - Captures screen according to user selection, hold image in clipboard.
Changing the output format
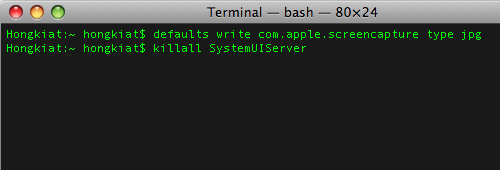
By default, Mac outputs screen captures in .PNG (Portable Network Graphics) format if you did not include ‘Control’. If you prefer JPG, GIF, TIFF over the default .PNG, here’ how you can it manually. Launch Mac’s Terminal and insert these 2 commands.
- defaults write com.apple.screencapture type jpg
- killall SystemUIServer
7 Tips For Improving Graphic Design Portfolios
Acquiring new clients via your online graphic design portfolios is no easy task, especially for designers who do not have the time to dive into extensive online marketing and search engine tactics. So if you would like to make the most of the traffic you DO get, check out the tips below. All these tips are meant to make your portfolio more client friendly, which means more money for you!
Online Design Portfolio Tips
1. Create a One Page Portfolio
One page Graphic Design Portfolios are a proven method of showcasing work online. They follow a similar format seen on many sales letters such as on my ebook site about how to Start a Clothing Line. The point is to keep the viewer’s eyes and actions focused.
With one page the person only has the option to go from the top of your site to the bottom and by the time they get to the bottom, your text content or great designs should convince them to want to buy or work with you. Your call to action probably wont be a “Buy Now” button, but it could be your contact information or a “Get a Free Project Quote”. Having a prominent call to action and contact information, which we will cover more is extremely important and keeping your portfolio to one page can produce great results.
2. Keep Your Portfolio Up to Date
Most designers improve over time and that’s why you need to keep your portfolio fresh with new projects, as long as they are better! Many bloggers and other design sites feature content from portfolios, and they will actually check to see if you have new work on your site. You can also submit your new work to design galleries, which can get your more traffic and potential clients!
3. Take Multiple Photos of Print Work
Taking professional photos of your print work can really give you an edge. Obviously your work appears more realistic when its printed and taking photos of the printed pieces just gives your work that extra special touch. Just make sure the photos are crisp, in focus, have proper lighting and a good background. You should also play around with different view points. Even if you can’t get a sample of the prints from your client you can still do short run prints of your projects yourself. Its worth it!
If you wanna see some great photos of business cards check out CardObserver.com and you will see for yourself how much better cards that are photographed look compared to digital representations.
4. Provide Live Demos of Web Work
Providing live demos of web work can have as big an impact as the tip above. People will feel more confident in your services if they can see your work in action! So if your web designs are live, provide a clear live demo link. If that is not possible code the framework yourself or at least host a screen shot of the site on your server and code in the background images so it mimics the appearance of a live site. To prove my point at why live demos are important, just take a look at any good site that sells html themes or WordPress themes and you will see most of them have live demo links!
5. Make Your Contact Info Easy to Find
I have seen too many portfolio sites with impossible to find contact information. People have a short attention span on the internet so when they get an urge to contact you, they should be able to do so within 3 seconds! Always have your contact information “Above the Fold” meaning your contact info or link to a contact page should be easily seen without any scrolling or minutes looking around. I also recommend putting your contact info in the footer of your site and possibly have a “Call to Action” in your content area.
6. Offer Multiple Forms of Contact
Everyone has different comfort levels when it comes to contacting another person. I prefer email or instant messenger, while some people always want to chat on the phone. You should offer as many contact options as possible, phone and email being the most important two. The more methods of contact you have the more comfortable you will make a potential client feel about getting in touch with you.
7. Show Customer Testimonials or Previous Clients
A big part of building trust with a viewer is showing them you have experience! Showing testimonials or a list of previous clients is a great way to quickly build trust with a viewer of your portfolio. Its ok if you don’t have huge clients like Apple or Honda, but if you have worked with major clients you better have them on your site! So consider creating a page just for testimonials or previous clients you have worked with.
Never Loose Hope & Never Quit Trying
Never Loose Hope & Never Quit Trying
There is no replacement for hardwork.
Success = Hardwork + Opportunity.
Yesterday in a magazine, I came across three such personality who proved the above equation.I like to share with you all.
First Personality : Abraham Lincoln
Year -- Incident
1816 -- Family was forced out of home, and he had to work to support them
1818 -- His mother died
1831 -- Failed in business
1832 -- Lost election for legislature
1832 -- Lost his job
1832 -- Wanted to go to law school but couldn't get in
1833 -- Began a business and went bankrupt, spent next 17 years paying off the debt
1835 -- Sweetheart died
1836 -- Nervous breakdown
1838 -- Sought to become speaker of legislature and was defeated
1843 -- Defeated for Congress
1848 -- Defeated for re-election to Congress
1849 -- Rejected for job of land officer
1854 -- Defeated for US Senate
1856 -- Defeated for Vice President
1858 -- Defeated for US Senate
1860 -- Elected President of the United States
Second Personality : Bollywood actor Shammi Kapoor
He made the biggest comeback of all times in Indian cine history. His first 18 movies are big flop. No one was ready to give him a chance. Not even his famous brother 'Raj Kappor'. Finally he himself directed and produced his 19th movie and it was a big hit. After that it was no looking back for him. He became a matinee icon.
Third Personality : A V Meiyappan
His first 3 movies were big flops. He lost nearly 6 lakhs (Mind you, 6 lakhs was huge money then). He didn't lose heart. He took another movie 'Alli Arjuna' , which became a huge hit. Now his production is considered as the biggest in Asia.
Something to think about...
So many failures were the real pillars of success!!!
Never Lose Hope & Never Quit Trying.
Impossible is the word found in the dictionary of fools.
YOU WILL SUCCEED
And I say that even the word Impossible itself indicates (I`M POSSIBLE)
Cricketers and Advertisements
1. Who appears in Sear Elcot Television?
Answer: Gavaskar
2. Ravi Shastri, Viv Richards, Allan Border appears together in which ad?
Answer: Only Vimal
3. Who appears in Maltova ad?
Answer: Srikkanth
4. Botham, Tendulkar, Border appears together in which ad?
Answer: Gillette
5. Who appears in Amp Sanmar?
Answer: S Waugh
6. Nayan Mongia appears in which ad?
Answer: Four Square, Moove
7. Robin Singh appears in which ad?
Answer: Britannia , Big fun
8. Who appears in Palmolive?
Answer: Kapil
9. Keith Miller,member of 1948 invincible, appears in which ad? (clue: very famous cream)
Answer: Bryl cream
10. Ganguly and Srinath appears together in which ad?
Answer: Coke
Some Interesting Informations 2
Here are some interesting info, Just skim through.
Many years ago, in Scotland, a new game was invented. It was ruled "Gentlemen Only...Ladies Forbidden"...and thus the word GOLF entered into the English language.
Every day more money is printed for Monopoly than the US Treasury.
Men can read smaller print than women can; women can hear better.
Coca-Cola was originally green.
It is impossible to lick your elbow.
The State with the highest percentage of people who walk to work: Alaska
The percentage of Africa that is wilderness: 28% (now get this...) Percentage of North America that is wilderness: 38%.
The cost of raising a medium-size dog to the age of eleven: $6,400.
The average number of people airborne over the US any given hour: 61,000.
Intelligent people have more zinc and copper in their hair.
The world's youngest parents were 8 and 9 and lived in China in 1910.
The youngest pope was 11 years old.
The first novel ever written on a typewriter: Tom Sawyer.
The San Francisco Cable cars are the only mobile National Monuments.
Each king in a deck of playing cards represents a great king from history:
Spades - King David
Hearts - Charlemagne
Clubs -Alexander, the Great
Diamonds - Julius Caesar
111,111,111 x 111,111,111 = 12,345,678,987,654,321
If a statue in the park of a person on a horse has both front legs in the air, the person died in battle. If the horse has one front leg in the air the person died as a result of wounds received in battle. If the horse has all four legs on the ground, the person died of natural causes.
Only two people signed the Declaration of Independence on July 4th, John Hancock and Charles Thomson. Most of the rest signed on August 2, but the last signature wasn't added until 5 years later.
Q. Half of all Americans live within 50 miles of what?
A. Their birthplace
Q. Most boat owners name their boats. What is the most popular boat name requested?
A. Obsession
Q. If you were to spell out numbers, how far would you have to go until you would find the letter "A"?
A. One thousand
Q. What do bulletproof vests, fire escapes, windshield wipers, and laser printers all have in common?
A. All invented by women.
Q. What is the only food that doesn't spoil?
A. Honey
Q. Which day are there more collect calls than any other day of the year?
A. Father's Day
In Shakespeare's time, mattresses were secured on bed frames by ropes.
When you pulled on the ropes the mattress tightened, making the bed firmer to sleep on. Hence t! he phrase.."goodnight sleep tight"
It was the accepted practice in Babylon 4,000 years ago that for a month after the wedding, the bride's father would supply his son-in-law with all the mead he could drink. Mead is a honey beer and because their calendar was lunar based, this period was called the honey month ... which we know today as the honeymoon.
In English pubs, ale is ordered by pints and quarts. So in old England, when customers got unruly, the bartender would yell at them "Mind your pints and quarts, and settle down. It's where we get the phrase "mind your P's and Q's"
Many years ago in England, pub frequenters had a whistle baked into the rim, or handle, of their ceramic cups. When they needed a refill, they used the whistle to get some service. "Wet your whistle" is the phrase inspired by this practice.
AND FINALLY~
At least 75% of people who read this will try to lick their elbow.
Some Interesting Informations
Nokia Got its name from a river in Finland.
ofoto is the older name of Kodak.
"Big Blue" is the nick name of IBM.
"Bringing Employment and Quality" is the expansion for the name of telecom company BENQ.
"Integrated Electronics " is the full form of INTEL.
Thomas Alva Edison's auttobiography is 'Baa Baa Black Sheep'
Ruth Handler is the inventor of Barbie Doll.
Dancing MahaRaja is the japanese version of the Tamil feature film Muthu and it's second part is Dancing Maharaja 2 which is the dubbing of Yejamaan. Both the movies are Rajinikanth's.
George W Bush's party symbol is Elephant and Kerry's is Donkey.
George W Bush and Mayawathi of BSP share the same party symbol 'Elephant'.
The first dog of US is Miss Beazley
Name of Four queens in Playing Cards are Juno, Judith, Rachel and Pallas Anthena
The series is 1, 11, 21, 1211, 111221, 312211,13112221. Description of previous number in the series (....one occurence of 3,one occurence of one)
Saurav Ganguly and Greg Blewett were dismissed for 99 at the same time in different test matches held in different part of the world
Sir Richard Hadlee is the only cricketer to be knighted
Now, a pace-maker for the brain
One needn't look westward these days to cure a disabling ailment like Dystonia - a neurological disorder in which sustained muscle contractions cause twisting and repetitive movements or abnormal postures. The Deep Brain Stimulation (DBS) procedure, which provides relief to these patients, is very much accessible within our country.
Four Indian hospitals offer the procedure: Delhi's All India Institute of Medical Sciences (AIIMS), Mumbai's Jaslok Hospital, Hyderabad's NIZAMS and Srichitra Institute in Thiruvananthapuram. The neurosciences department at AIIMS offers this treatment at minimal price.
Only a handful of hospitals around the world (five in the US and three in the UK) offer this procedure at almost 10 times cost. "This surgery is for those patients for whom we have nothing more to offer in terms of medicines or injections," said Dr Vinay Goyal, associate professor of neurology at AIIMS, who sees about 20 Dystonia patients every week.
Deep brain stimulation is a surgical procedure involving the implantation of a device called a pacemaker, which sends electrical signals to a specific part of the brain. Like the heart's pacemaker, this device - a battery - functions like the pacemaker of the brain.
The battery is implanted near the shoulder and sends signals through a wire connected to electrodes placed at the area of the brain that is most affected. All components are surgically implanted inside.
"In Dystonia there are a lot of involuntary movements. The high frequency stimulation stops those involuntary movements," said Dr Aditya Gupta, associate professor of neurosurgery at AIIMS, who conducts most of the surgeries.
The last and most important part of the procedure is programming the device. "You have to programme the device in such a way that it sends right amplitude and frequency of current to give desired results," said Gupta.
For each patient, the amplitude and the frequency may differ. Dystonia is a genetic disorder caused by the DYT1 gene.
Normally used to treat tremors caused by Parkinson's disease, the procedure is now gaining popularity among Dystonia patients as well. AIIMS has operated on three cases of dystonia in the past three years.
The most recent, 22-year-old Baby Kumari from Bihar, was operated on February 4.
Wednesday, February 18, 2009
Some Free Hosters / Hosting SItes
 SnapDrive.net
A handy free service that lets you upload, share and save files in an online hard drive. The service is easy to use and you're not even required to register. Anonymous uploading is limited to 20 megs per file. Registered users get 2 gigs of storage and can upload files of up to 100 megs.
Picture HostingThis site offers free hosting for your photos and other images and gives you 50 megs of storage space. The site lets you share images with your friends and create thumbnail picture galleries. Supported image formats include JPEG, GIF and PNG.
VodaShareA free image hosting service that accepts many file formats, including JPG, GIF, BMP, and PNG. VodaShare is suitable for image hosting for sites like Friendster, eBay and Orkut, as well as forums. No registration is required to upload files.
UpMyFiles.comA free file-hosting service that allows you to upload files of up to 500 megabytes in size. UpMyFiles.com offers support for download accelerators and allows URL, FTP and Flash uploads.
Easy2upload.netA free image hosting service that lets you post images on message boards, online auctions and Web classifieds and also lets you share pictures with your friends and family. Supported image files include GIF, JPG, JPEG and PNG.
Dropfiles.netAn easy-to-use free image hosting service that gives you 250 megabytes of storage and 1 gig of bandwidth per month. The individual files you upload here can be up to 2 megs in size.
IXDrive.co.ukHere's a fast, simple-to-use free image hosting service that has no bandwidth restrictions. Individual file uploads can be up to 3 megs in size. Image formats supported are JPG, JPEG, GIF and PNG.
ElectronicFiles.netA free image hosting service that gives you 5 gigs of storage space and 5 gigs monthly bandwidth. You can upload individual files of up to 10 megs in size. All file formats are permitted.
Alkaspace.comA free image hosting service that offers lots of useful features, including an auction gallery, portfolio, slideshow and a "spin 360" option. Alkaspace.com gives you 99 megs of disk space and is suitable for image hosting for Xanga, MySpace, eBay, blogs, message boards, and more. Here, you can host JPG, GIF and PNG files.
Piczs.comThis versatile image hosting site (which is available in a free version) lets you share photos and other images with your friends and family, as well as host images for online auctions. Piczs.com lets you create image portfolios, auction galleries, slide shows, and more.
Free Image HomeHere's a free image hosting service that gives you 20 megs of space and offers 250 megs of monthly bandwidth. Free Image Home lets you browse your uploaded images and the service supports JPG, GIF and PNG image formats.
ImageUploadsA free image hosting service, ImageUploads is easy to use and allows hotlinking. This service is handy for posting pictures on Web sites, forums, eBay auctions, etc. Supported image formats include GIF, JPG and SWF.
PhotoServer.usA free image hosting service that gives you 555 megs of disk space and 1,000 megs of monthly bandwidth. At this site, you can create image portfolios, slide shows and auction galleries. Supported file types include JPG, GIF and PNG.
Super File HostingA free file hosting service with an easy-to-navigate interface that lets you upload an unlimited number of files. Each file you upload can be up to 25 megs in size. Your files will be stored here permanently (as long as they're downloaded at least once every 30 days).
Img4Free.comHere's an easy-to-use free image hosting service that gives you 20 megs of storage space and 200 megs of monthly bandwidth. Image formats supported are JPG, GIF and PNG
FreeImageHosting.netThis is a new free image hosting service that is easy to use. FreeImageHosting.net is useful for posting images on message boards, online auctions, online classifieds, and sharing pictures with your friends and family. The service supports GIF, JPG and PNG file extensions.
ImagePros.usHere's a free image hosting service that offers you unlimited bandwidth and lets you store images of up to 3 megs in size. ImagePros.us is suitable for posting images on message boards, online auctions, Web classified ads, blogs, and more.
 Upload Image
(Note: this site is temporarily unavailable). This site offers free image hosting and is suitable for posting images on message boards, online auctions and classified ad sites (or sharing pictures with your friends and family). Files here may be up to 100 kilobytes in size. File extensions permitted include GIF and JPG.
FasterUpload.com(Note: this site is temporarily unavailable). This is a speedy, easy-to-use image and video hosting service that requires no registration and lets you host files up to 100 megs in size. FasterUpload.com allows all file extensions and split files are permitted.
Sunday, February 8, 2009
15 Ways To Create Website Screenshots
Taking screenshots of web sites is probably one of the most commonly done tasks on the internet - doubly so if you have a blog or work as a web designer.
My pick from the list that will follow is Save as image - an aptly named Firefox plugin that lets you save a page, frame, or part of either as an image directly from Firefox.
After you install it on Firefox it will make a link after you right click and you can “Save page as image…” and a pop-up will appear with more options with your image. Very nice plugin.
Pearl Crescent Page Saver - Save images of web pages in jpg or png format; save the entire page or just a portion of it, with the ability to automatically scale the image to a smaller size.
Picnik for Firefox - if you use online image editor Picnik this Firefox plugin enables you to easily import a screenshot of the currently opened webpage into it.
Snissa - simple Firefox plugin for taking web page screenshots.
Screengrab! - a plugin that lets you save visible part of window, the entire page, just a selection, or a particular frame of a webpage.
ieSnapshotter - a shareware plugin for Internet Explorer that allows you to take screenshots and thumbnails of web pages.
Standalone programs
SnagIt - definitely one of the best programs for screenshot capturing, with all the options you might need. Integrates with Firefox, can replace the standard Windows print screen function, and enables you to create profiles for various types of use. Costs 39.95 bucks, but you can try out a free trial version before buying.
FastStone Capture - a powerful utility for taking screenshots with a floating control panel as well as the ability to capture anything on the screen including windows, objects, full screen, rectangle regions, and even freehand-selected regions.
WebShot - a program that allows you to take screenshots and thumbnails of web pages or whole websites. Its main advantage is its powerful command line utility which enables you to automate the process of taking screenshots.
Paparazzi! - a tiny application for Mac OS X that lets you take screenshots of web pages.
PrintKey - replaces your print screen function with a better one with more features. There’s a commercial version but you can also find an older, unsupported, freeware version on the provided link.
I4X Screencatcher - take screenshots of the active window, entire screen, or the selected area with this tool.
InstantShot - an advanced but freeware application for Mac OS X that sits in your menu bar and gives you a myriad of screen capturing options, including capturing a region, hotkeys, several output formats, image scaling and many others.
Web based
WebShotsPro - enter a URL address and get a screenshot of the website in question. Simple. You might encounter quite a long queue before getting your screenshot, though.
Thumbalizr - already mentioned in a recent article, Thumbalizr lets you create screenshots of websites by pasting their URL; the only problem is that it doesn’t always work.
Password Protect Folders On MAC

If you own a mac you’ve probably asked yourself how can you protect some folders / files with a password! Well mac hasn’t built in any password protecting script for any folders or files, but you can use a free program that will do this for you. It’s called LameSecure and it simply protects your folders with your selected password.
Get the application, drag it in your Application folder and when you want to protect a folder with a password simply run the application, select the folder you want to protect it, type your password and hit Ok! You can then quit the program and your folder will still be password protected. This is nice if you have some personals files within your folder.
Oriya / Odia / Odiya Wallpapers For You
Hello Friends,
Wallpapers of different languages are available nowadays,
So I thought of running a blog featuring Oriya / Odiya / Odia Wallpapers.
You can find the same in my e-blog:
http://oriyawallpapers.blogspot.com/
Hope You Will Like Them.
With Regards
Luvzguy
Wallpapers of different languages are available nowadays,
So I thought of running a blog featuring Oriya / Odiya / Odia Wallpapers.
You can find the same in my e-blog:
http://oriyawallpapers.blogspot.com/
Hope You Will Like Them.
With Regards
Luvzguy
Wednesday, February 4, 2009
101 Blog Tips
1. if you are not, start blogging today
2. write about something that you love
3. if you are serious about blogging buy your own domain
4. make sure your domain name is equal to your blog name
5. use a short and easy to remember name
6. use Wordpress
7. use Wordpress plugins
8. blog with consistency
9. write at least 5 posts a week
10. proofread
11. proofread one more time
12. interact with other bloggers
13. leave meaningful comments
14. leave funny comments
15. leave the first comment
16. backup your blog
17. get rid of the sidebar calendar
18. choose your niche wisely, not too big and not too small
19. participate in online forums
20. put a link on your signature
21. use blog carnivals
22. content is king
23. customize your blog template
24. use trackbacks
25. simplicity is the way to go
26. leverage social bookmarks
27. consider joining a blog network
28. write “Top 10 lists
29. use tags
30. use pings
31. write “How to” articles
32. make your posts scannable
33. list your blog on directories
34. ask questions to your readers
35. use Feedburner
36. use sense of humor37. be generous
38. encourage readers to subscribe
39. have some spare posts for emergencies
40. encourage readers to digg your posts
41. put an RSS subscription icon on every single page
42. use “series” of posts
43. return comments
44. return links
45. use readable fonts
46. gather .edu and .gov backlinks
47. break long posts in more parts
48. experiment with different revenue sources
49. write “pillar articles“
50. use Google Analytics
51. study those numbers
52. use email interviews
53. be yourself
54. avoid duplicate content
55. use an RSS reader
56. read as many blogs as possible
57. focus on timeless content
58. have an “About” page
59. have a picture of yourself on the “About” page
60. crate your own “Advertise Here” page
61. use meta tags wisely
62. learn the basics of SEO
63. use pictures whenever possible
64. create value for your readers
65. place ads wisely
66. be patient
67. consider getting a co-blogger
68. submit your articles to directories
69. share what has worked for you
70. share what has not worked for you
71. read Problogger.net
72. do not clutter your sidebar with icons
73. get rid of looooong blogrolls
74. experiment with Google Adsense
75. experiment with Text-Link-Ads
76. link to other blogs as often as possible
77. make it easy for visitors to contact you
78. use titles effectively
79. offer email subscriptions
80. always answer to questions
81. always answer to comments
82. use Technorati
83. enable subscription to comments
84. offer useful tools or resources
85. write with a personal touch
86. become an expert in your niche
87. do not rely on “linking posts”
88. always give your opinion
89. use simple colors
90. participate in blogging projects
91. get to know other bloggers personally
92. list your best articles
93. have a voice
94. organize your categories
95. talk directly to your readers
96. make your URL structure efficient
97. put functional links on your footer
98. mention your sources or references
99. do monthly roundups
100. consider adding podcasts
101. create a “101 list”
200 Prefixes and Suffixes for Domain Names
Classic suffixes:
* house
* central
* point
* home
* place
* garden
* site
* spot
* park
* dome
* bay
* web
* net
* cave
* base
* heaven
* portal
* world
* camp
* network
* county
* street
* city
* alley
* depot
* valley
Other suffixes:
* now
* resources
* tools
* source
* review
* system
* book
* guide
* talk
* data
* vision
* load
* box
* focus
* beat
* voice
* share
* cafe
* nexus
* zone
* sight
* link
* lab
* insight
* vine
* board
* flow
* signs
* network
* wire
* cast
* ville
* nation
* egg
* cove
* news
* today
* future
* fun
* watch
* story
* fever
* coast
* side
* road
* heat
* bite
* insider
* club
* connect
Classic prefixes:
* the
* my
* i
* me
* we
* you
* e
* top
* pro
* best
* super
* ultra
* all
* cyber
* simply
* free
* 1st
Other prefixes:
* meta
* re
* metro
* urban
* head
* hit
* front
* techno
* ever
* rush
* think
* solo
* radio
* vip
Adjectives that can be used as prefixes:
* hot
* smart
* cool
* hot
* fast
* fresh
* sleek
* first
* daily
* best
* sharp
* light
* classic
* fast
* great
* quick
Latin prefixes:
* ubi (when)
* bis (twice)
* ad (to, towards)
* ambi (both)
* inter (between)
* liber (free)
* mono (single)
* poli (many)
* tele (distant)
* omni (all)
* exo (outside)
* extra (addition)
* hyper (over)
* hypo (under)
* intro (within)
* proto (first)
* intra (within)
* micro (little)
* macro (large)
* multi (many)
* neo (new)
* iso (equal)
* mono (one)
Latin words that can be used both as prefix and suffix:
* io (I in Italian)
* virtus (virtue)
* ego (me)
* vox (voice)
* ex (out of)
* ideo (idea)
* novo (renew)
* novus (novelty)
* pax (peace)
* rex (king)
* velox (fast)
* verus (true)
* vivo (alive)
* nova (new)
Multipliers prefixes:
* pico
* nano
* micro
* milli
* kilo
* mega
* giga
* tera
* peta
Scientific prefixes:
* aero
* cosmo
* deca
* eco
* geo
* hex
* oxy
* uni
* poly
Words that work both as prefix and suffix:
* media
* direct
* access
* ez
* easy
* info
* interactive
* biz
* buzz
* bit
* byte
* up
* tech
* on
* out
* auto
* pulse
* x
* venture
* trend
* life
* retro
* secret
10 Costly Assumptions on Web Development
“Never assume.” - These 2 words represent the greatest advice ever given to me on the topic of website optimization. Here’s a list of 10 assumptions site owners make (myself included) that could cost you a ton of business.
Assumption #1: People will know how to find your website
We often assume that people have memorized or bookmarked our web address. But what happens when people forget, or are using a different computer and don’t have access to bookmarks? In addition to ranking on Google for your brand/company name, do you rank for common misspellings and variations? One company I work with uses uses pay per click to bid on at least a dozen variations / typos of their brand name, which is often misunderstood when spoken. What about your domain name? Especially if your URL contains dashes (example-url.com) or a top level domain of anything besides “.com”, consider buying up every reasonable variation you can afford, and redirecting it to the correct address.
Assumption #2: People know what you sell
How many times have you landed on the homepage of a website, and were unable to understand the primary purpose, product, or service? We often neglect to succinctly inform our customers about our product or service, which leads to a prompt bounce from visitors.
Assumption #3 : Everything will go as planned
Here’s an experiment. Try going through your website conversion funnel (checkout process, contact us form, etc) and do everything wrong. For example, enter an invalid zip code, click on things that weren’t meant to be clicked on, click the back, forward, and refresh buttons on your browser excessively. You might be surprised what you see. How well does your site handle errors? When people stray off the beaten path, can they get back?
Assumption #4: People know where to click
Don’t assume that because you know where to click, everyone knows where to click. Creative can be beautiful and attention grabbing, yet completely worthless if people don’t know what to do next. The power of a
Assumption #5: People know how to get home
Yes, most people know that clicking the company logo will take them to the homepage, but not everyone. Recently, I performed a test on a website and found that 45% of visitors preferred clicking on a link that actually said “Home” instead of the company logo. Even worse is when interior pages offer no link at all back to the homepage.
Assumption #6: People know where they are
People don’t always start on your homepage, and navigate step by step to their destination. Maybe they landed on an interior page from a search engine, and they have no idea where to go next. Breadcrumb navigation helps orient visitors, and establishes a navigational hierarchy.
Assumption #7: People know how to buy
This one is quite common, unfortunately. Many eCommerce sites assume the visitor will be on the shopping cart page to checkout. However, my experience has found that customers will look for a “checkout” button from any page of a site whenever they are ready to complete a purchase. If it’s not painfully obvious where to go, you might just lose a sale.
Assumption #8: People will volunteer loads of personal information
It’s important to think like a customer when building registration forms or checkout pages. Is the information you’re asking for so important that you’re willing to lose a customer because of it? The truth is, you will lose a certain percentage of customers for every additional piece of unnecessary information you ask for.
Assumption #9: People will contact customer service if they have a question or problem
Actually no, they will probably just leave and never return. In my experience, one customer question or complaint usually represents at least 10 other unspoken ones of the same nature. It’s best not to count on customers to tell you about problems, but rather to discover them yourself.
Assumption #10: People will come back
Even if people love your site, don’t assume they’ll be back unless you give them a good reason. This is why it’s so crucial to capture an email address, since it provides a proactive follow up mechanism. Other tactics to help bring in repeat visitors include having an RSS feed, a section highlighting what’s new, and constantly updated, fresh content. I can’t tell you how many incredible sites I’ve visited and completely forgotten about. When a do remember them, I often can’t remember the url or brand name. (see assumption #1)
28 Ways to Make Money with Your Website
There are several lists with “ways to make money with a website” on the Internet, but none of them seem to be complete. That is why I decided to create this one. If you know a method that is not listed below, just let us know and we’ll update it.

Notice that ways to make money with a website are different from ways to make more money from it. Methods to increase your traffic or click-through rate will help you make more money, but they do not represent a method of making money per se.
For example, one could suggest that blending AdSense ads with the content is a way to make money from a website. In reality it’s not; it’s just a way to make more money by improving your ad click-through rate. The real monetization method behind it is a PPC ad network.
The list is divided into direct and indirect methods, and examples and links are provided for each point. Enjoy!
Direct Methods
1. PPC Advertising Networks
Google AdSense is the most popular option under this category, but there are also others. Basically you need to sign up with the network and paste some code snippets on your website. The network will then serve contextual ads (either text or images) relevant to your website, and you will earn a certain amount of money for every click.
The profitability of PPC advertising depends on the general traffic levels of the website and, most importantly, on the click-through rate (CTR) and cost per click (CPC). The CTR depends on the design of the website. Ads placed abode the fold or blended with content, for instance, tend to get higher CTRs. The CPC, on the other hand, depends on the nice of the website. Mortgages, financial products and college education are examples of profitable niches (clicks worth a couple of dollars are not rare), while tech-related topics tend to receive a smaller CPC (sometimes as low as a couple of cents per click).
The source of the traffic can also affect the overall CTR rate. Organic traffic (the one that comes from search engines) tends to perform well because these visitors were already looking for something, and they tend to click on ads more often. Social media traffic, on the other hand, presents terribly low CTRs because these visitors are tech-savvy and they just ignore ads.
List of popular CPC advertising networks:
2. CPM Advertising Networks
CPM advertising networks behave pretty much as PPC networks, except that you get paid according to the number of impressions (i.e., page views) that the ads displayed on your site will generate. CPM stands for Cost per Mille, and it refers to the cost for 1,000 impressions.
A blog that generates 100,000 page views monthly displaying an advertising banner with a $1 CPM, therefore, will earn $100 monthly.
CPM rates vary with the network, the position of the ad and the format. The better the network, the higher the CPM rate (because they have access to more advertisers). The closer you put the ad to the top of the page, the higher the CPM. The bigger the format (in terms of pixels), the higher the CPM.
You can get as low as $0,10 and as high as $10 per 1,000 impressions (more in some special cases). CPM advertising tends to work well on websites with a high page views per visitor ratio (e.g., online forums, magazines and so on).
List of popular CPM advertising networks:
3. Direct Banner Advertising
Selling your own advertising space is one of the most lucrative monetization methods. First and foremost because it enables you to cut out the middleman commissions and to determine your own rates. The most popular banner formats on the web are the 728×90 leaderboard, the 120×600 skyscraper, the 300×250 rectangle and the 125×125 button.
The downside of direct banner advertising is that you need to have a big audience to get qualified advertisers, and you will need to spend time managing the sales process, the banners and the payments.
Related links:
- How to Find Advertisers for Your Website
- Finding Advertisers for Your Blog
- Direct Advertising Sales for Beginners
- Openads Ad Server
- OIO Publisher Ad Platform
4. Text Link Ads
After Google declared that sites selling text links without the nofollow tag would be penalized, this monetization method became less popular.
Many website owners are still using text links to monetize their sites, though, some using the nofollow tag and some not.
The advantage of this method is that it is not intrusive. One can sell text links directly through his website or use specialized networks like Text-Link-Ads and Text-Link-Brokers to automate the process.
Text link marketplaces and networks:
5. Affiliate Marketing
Affiliate marketing is a very popular practice on the Internet. Under this system you have a merchant that is willing to let other people (the affiliates) sell directly or indirectly its products and services, in exchange for a commission. Sometimes this type of advertising is also called CPA (cost per action) or CPL (cost per lead) based.
Affiliates can send potential customers to the merchant using several tools, from banners to text links and product reviews.
In order to find suitable affiliate programs you can turn to individual companies and publishers like Dreamhost and SEOBook, or join affiliate marketplaces and networks.
List of popular affiliate marketplaces and networks:
6. Monetization Widgets
The latest trend on the web are widgets that let you monetize your website. Examples include Widgetbucks and SmartLinks. Some of these services operate under a PPC scheme, others behave like text link ads, others yet leverage affiliate links.
Their main differentiator, however, is the fact that they work as web widgets, making it easier for the user to plug and play the service on its website.
List of companies that provide monetization widgets:
7. Sponsored Reviews
PayPerPost pioneered this model, with much controversy on the beginning (related to the fact that they did not require disclosure on paid posts). Soon other companies followed, most notably Sponsored Reviews and ReviewMe, refining the process and expanding the paid blogging model.
Joining one of these sponsored reviews marketplaces will give you the opportunity to write sponsored posts on a wide range of topics. Not all bloggers are willing to get paid to write about a specific product or website (because it might compromise the editorial credibility), but the ones who do are making good money out of it.
If your blog has a big audience you could also offer sponsored reviews directly, cutting off the commissions of the middleman.
List of sponsored reviews and paid blogging networks:
8. RSS Feed Ads
With the quick adoption of the RSS technology by millions of Internet users, website owners are starting to find ways to monetize this new content distribution channel.
Feedburber already has its own publisher network, and you can sign-up to start displaying CPM based advertising on your feed footer. Bidvertiser recently introduced a RSS feed ad option as well, with a PPC scheme.
Finally, some blogs are also opting to sell banners or sponsored messages on their feed directly. John Chow and Marketing Pilgrim are two examples.
Related links:
9. Sponsors for Single Columns or Events
If you website has specific columns or events (e.g., a weekly podcast, an interview series, a monthly survey, a special project) you could find companies to sponsor them individually.
This method increases the monetization options for website owner, while giving advertisers the possibility to target a more specific audience and with a reduced commitment.
Mashable illustrates the case well. They have several advertising options on the site, including the possibility to sponsor specific columns and articles, including the “Daily Poll” and the “Web 2.0 Invites.”
Problogger also runs group writing projects occasionally, and before proceeding he publicly announce the project asking for sponsors.
10.Premium Content
Some websites and blogs give away part of their content for free, and charge for access to the premium content and exclusive tools.
SEOMoz is a good example. They have a very popular blog that gives advice and information on wide range of SEO related topics. On top of that visitors can decide to become premium members. It costs $48 monthly and it grants them access to guides, tools and other exclusive material.
11. Private Forums
While the Internet is populated with free forums, there is also the possibility to create a private one where members need to pay a single or recurring fee to join.
SEO Blackhat charges $100 monthly from its members, and they have thousands of them. Obviously in order to charge such a price for a forum membership you need to provide real value for the members (e.g., secret techniques, tools, and so on).
Performancing also launched a private forum recently, focused on the networking aspect. It is called The Hive, and the monthly cost is $10.
These are just two examples. There are many possibilities to create a private and profitable forum, you just need to find an appealing angle that will make it worth for the members.
List of popular forum software:
12. Job Boards
All the popular blogs are trying to leverage job boards to make some extra income. Guy Kawasaki, ReadWriteWeb, Problogger… you name it.
Needless to say that in order to create an active and profitable job board you need first to have a blog focused on a specific niche, and a decent amount traffic.
The advantage of this method is that it is passive. Once you have the structure in place, the job listings will come naturally, and you can charge anywhere from $10 up to $100 for each.
List of popular job board software:
13. Marketplaces
Sitepoint is the online marketplace by excellence. Some websites and blogs, however, are trying to replicate that model on a smaller scale.
Depending on your niche, a market place that allows your visitors to buy, sell and trade products could work well. Over the time you could start charging a small fee for new product listings.
The problem with this method is that there are no standard software on the web, so you would need to hire a coder to get a marketplace integrated into your website.
You can see an example of a marketplaces being used on EasyWordpress and on Mashable.
14. Paid Surveys and Polls
There are services that will pay you money to run a small survey or poll on your website. The most popular one is called Vizu Answers.
Basically you need to sign up with them, and select the kind of polls that you want to run your site. Most of these services operate under a CPM model.
15. Selling or Renting Internal Pages
Million Dollar Wiki made this concept popular, but it was being used on the web for a long time around (check Pagerank10.co.uk for instance).
These websites sell for a single fee or rent for a recurring fee internal pages on their domain. Usually they have either high Pagerak or high traffic, so that people purchasing a page will be able to benefit in some way.
Implementing this method on a small blog would be difficult, but the concept is interesting and could be explored further.
16. Highlighted Posts from Sponsors
Techmeme probably pioneered this idea, but somehow it has not spread to other websites. The tech news aggregator displays editorial posts on the left column, and on the sidebar they have a section titled “Techmeme Sponsor Posts.”
On that section posts from the blog of the advertisers get highlighted, sending qualified traffic their way. Considering that the monthly cost for one spot is $5000 and that they have around 6 sponsors at any given time, it must be working well.
17. Donations
Placing a “Donate” link or button on a website can be an efficient way to earn money, especially if your blog is on a niche where readers learn and gain value from your content.
Personal development and productivity blogs, for instance, tend to perform well with donation based systems (one good example being Steve Pavlina).
A small variation of this method appeared sometime ago with the Buy Me a Beer plugin. This WordPress plugin enables you to insert a customized message at the bottom of each article, asking the readers to chip in for a beer or coffee.
18. In-text Adverting
In-text adverting networks like Kontera and Vibrant Media will place sponsored links inside your text. These links come with a double underline to differentiate them from normal links, and once the user rolls the mouse over the link the advertising will pop. Should the user click on it the site owner will make some money.
Some people make good money with this method, but others refrain from using it due to its intrusiveness. It is also interesting to note that very few mainstream websites have experimented with in-text advertising.
19. Pop-ups and Pop-unders
Pop-ups are a common yet annoying form of advertising on the Internet. If you are just trying to make a much money as possible from your website, you could experiment with them.
If you are trying to grow the traffic and generate loyal visitors, however, you probably should stay away from them. Just consider the hundreds of pop-up blockers out there: there is a reason why they are so popular.
Ad networks that use pop-ups:
20. Audio Ads
Also called PPP (Pay Per Play), this advertising method was introduce by Net Audio Ads. the concept is pretty simple: play a small audio advertising (usually 5 seconds) every time a visitor enters into your website. The user should not be able to stop it, creating a 100% conversion rate based on unique visitors.
The company is still rolling tests, but some users are reporting to get from a $4 to a $6 CPM. Regardless of the pay rate, though, this is a very intrusive form of advertising, so think twice before using it.
21. Selling the Website
Selling your website could be your last resource, but it has the potential to generate a big sum of money in a short period of time.
Market places on online forums like DigitalPoint and Sitepoint are always active with website buyers and sellers. Keep in mind that they most used parameter to determine the value of a website is the monthly revenue that it generates, multiplied by a certain number (the multiplier can be anything from 5 to 30, depending on the expectations of the seller, on the quality of the site, on the niche and other factors).
Some people also make money trading and flipping websites. They either create them from scratch or buy existing ones, and after some revamping they sell them for a profit.
Related links:
- How To Buy A Website And Flip It For Profit
- How To Sell A Website - How Much Is Your Website Worth?
- Where to sell a website? How to go about selling it?
Indirect Methods
22. Selling an Ebook
Perhaps one of the oldest money making strategies on the web, using a website to promote a related ebook is a very efficient way to generate revenue.
You could either structure the website around the book itself, like SEOBook.com, or launch the ebook based on the success of the website, like FreelanceSwitch did we the book How to be a Rockstar Freelancer.
Related links:
- Writing an ebook for your blog
- How to sell ebooks
- Processing payments for your ebook
- How to sell digital products online
- List of ebook selling software
23. Selling a Hardcover Book
Many authors and journalists leverage their blogs or websites to sell copies of hardcover books. Examples include Guy Kawasaki, Seth Godin and Malcolm Gladwell.
While most of these people were already renowned authors before they created their website, one could also follow the other way around. Lorelle VanFossen did exactly that with her Blogging Tips book. First she built her authority on the subject via her blog, and afterwards she published the book.
List of self publishing and publishing services:
24. Selling Templates or WordPress Themes
As more and more people decide to get an online presence, website templates and WordPress themes become hotter and hotter.
On this segment you have mainstream websites like TemplateMonster, as well as individual designers who decide to promote and sell their work independently.
Brian Gardner and Unique Blog Designs are two examples of websites that make money with the sales of premium and custom WordPress themes.
25. Offering Consulting and Related Services
Depending on your niche, you could make money by offering consulting and related services. If you are also the author of your blog, the articles and information that you will share will build your profile and possibly certify your expertise on that niche, making it easier to gain customers.
Chris Garrett used a similar strategy. First he created a highly influential blog on the blogging and new media niche, and afterwards he started offering consulting services to clients with related problems and needs.
26. Creating an Email List or Newsletter
Email lists and newsletters represent one of the most powerful marketing and money making tools on the Internet. They offer incredible conversion rates, and the possibility to call people to action in a very efficient way.
Creating a big list is a difficult task though, so if you have a popular website you could leverage it to increase the number of subscribers on your list.
Yaro Starak is a famous Internet marketer, and if you visit his blog you will notice that right on top he has a section encouraging visitors to subscribe to his email newsletter. Yaro generates five figures in revenues each month from his email newsletters, proving that this method works.
List of software to manage email newsletters:
27. Mentoring programs
People are willing to pay for someone or something that will teach them and give them knowledge (as opposed to mere information). Education is one of the biggest industries in the world, and the online landscape behaves in a similar way.
Creating a mentoring program related to the niche of your website could be very profitable if you manage to structure and promote it adequately. There is a wide range of media and tools that you can use to deliver the information, from text articles to audio and video lessons.
Brian Clark leveraged the success of Copyblogger to launch a mentoring program teaching people how to build membership and how to sell content online. The program is titled Teaching Sells, and it costs $97 monthly. Sounds expensive, but they have over 1,000 members.
28. Creating a conference around the website
If your website takes off and becomes an authority on its niche, you could create a conference around it. Depending on the size of your audience, the event could attract thousands of people, and you could make money directly from conference passes and sponsors.
Search Engine Land, for instance, created a series of conferences that visit several cities on the United States and on other countries as well. The conferences are called Search Marketing Expo, and the tickets and passes cost thousands of dollars.
Subscribe to:
Posts (Atom)


